In the enterprise it is common practice for the network administrator to filter or block certain content which may be inappropriate for a work or educational environment. By using open source technology it is possible to implement DNS level content blocking for your home network.
Why block content?
There are several reasons why one might want to block content at the network level. Many people use ad-blocking browser extensions on their PCs but then find that ads appear when browsing on their phones or when using different browsers. Some browsers such as Microsoft Edge don’t support extensions although this is likely to change when Edge becomes based on Chromium. Households with children may want to block adult content, content relating to drugs and weapons and piracy sites. Content blocking can also increase online security by blocking access to known phishing, fraud or malware domains.
What is DNS blocking?
DNS (Domain Name Service) is effectively the telephone directory of the internet. Devices connected to the internet are identified by their IP address (analogous to a phone number). This address uniquely identifies a device and allows traffic to be routed to it but it would be unreasonable to expect everyone to type in the IP address of a site to be able to access it. DNS allows the user to enter an easy to remember domain name such as google.com and translates this in to the IP address that your PC uses to reach the server. You can interact with DNS directly from most operating systems. Just open a command prompt or terminal and type “nslookup google.com”. When I ran this I got the following output:
Server:    8.8.8.8

  Address:    8.8.8.8
Non-authoritative answer:

  Name:    google.com

  Address: 216.58.206.142

  Name:    google.com

  Address: 2a00:1450:4009:819::200e
The top section shows the DNS server which was used and the next section shows the information it was able to find out about the domain. I now know that I can access google.com using the IPv4 address 216.58.206.142 or the IPv6 address 2a00:1450:4009:819::200e. If you run this on your own PC you will probably find that these addresses will be different as Google has thousands of servers and will balance load by redirecting different users to different servers.
Bear in mind that this information is given out by a DNS server and we access the correct site by trusting that the DNS server is giving out the correct IP address. If we control the DNS server we can start giving out bogus information to redirect traffic wherever we like, preventing users from accessing sites we want to block.
Of course if one knew the IP address for the blocked site they could simply type this in to the browser and it would not be blocked. It would also be possible to set the computer to point to another DNS server instead of our filtering one. While these techniques are not exactly difficult they are probably beyond the technical knowledge of most users so may not be an issue depending on your use case.
Setting up Pi-hole
Pi-Hole is an open source DNS resolver specifically designed for this type of DNS blocking. As the name suggests it was originally designed to run on a Raspberry Pi. It will, however run on most, if not all, Linux distributions on both x86 and Arm. If you intend to use it in an organisation or anywhere you expect to see a large volume of traffic a Pi will probably not be able to keep up and it would be best to run it in a VM. For the home, however, a Pi will probably be sufficient and provides a cost effective way to get started. For this guide I will be setting it up on an Ubuntu 18.04 server.
Installing the software
I have set up an Ubuntu 18.04 server using all of the default installation options and applied all updates.
We now download the repo and start the installer:
   git clone --depth 1 https://github.com/pi-hole/pi-hole.git Pi-hole
   cd Pi-hole/automated\ install/
   bash basic-install.sh
This will run through some initial setup and then take us to an ncurses based setup wizard which we will use to set our initial options. These options can all be changed via the web interface later.
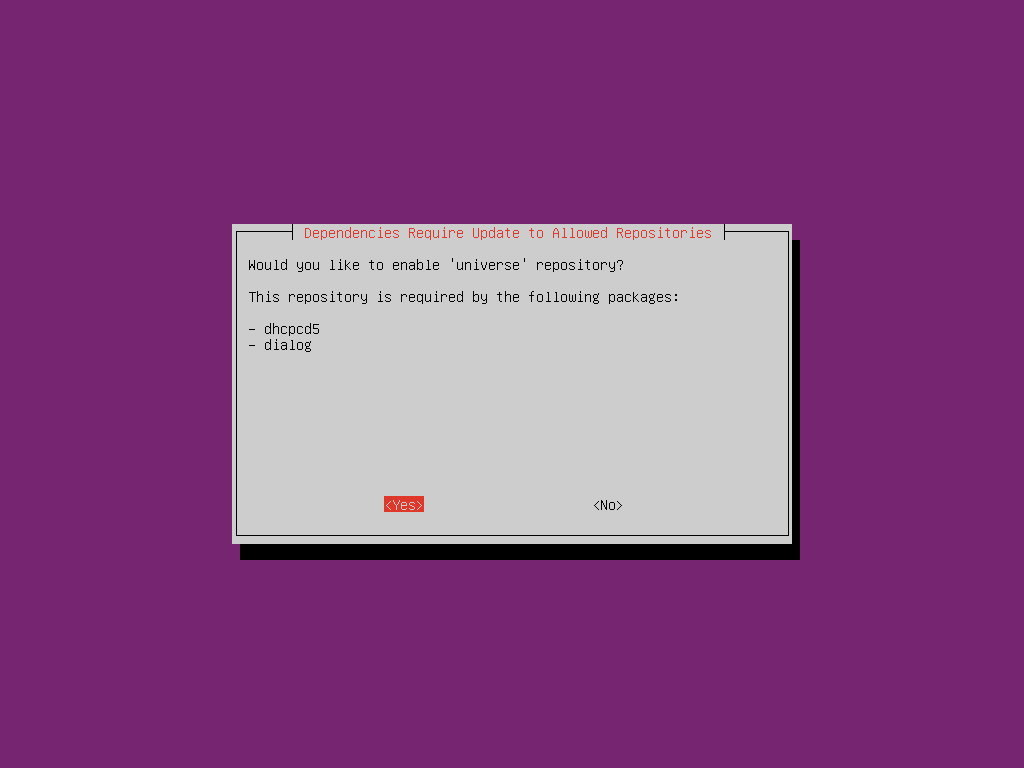
Enable ‘universe’ repository to install dependencies
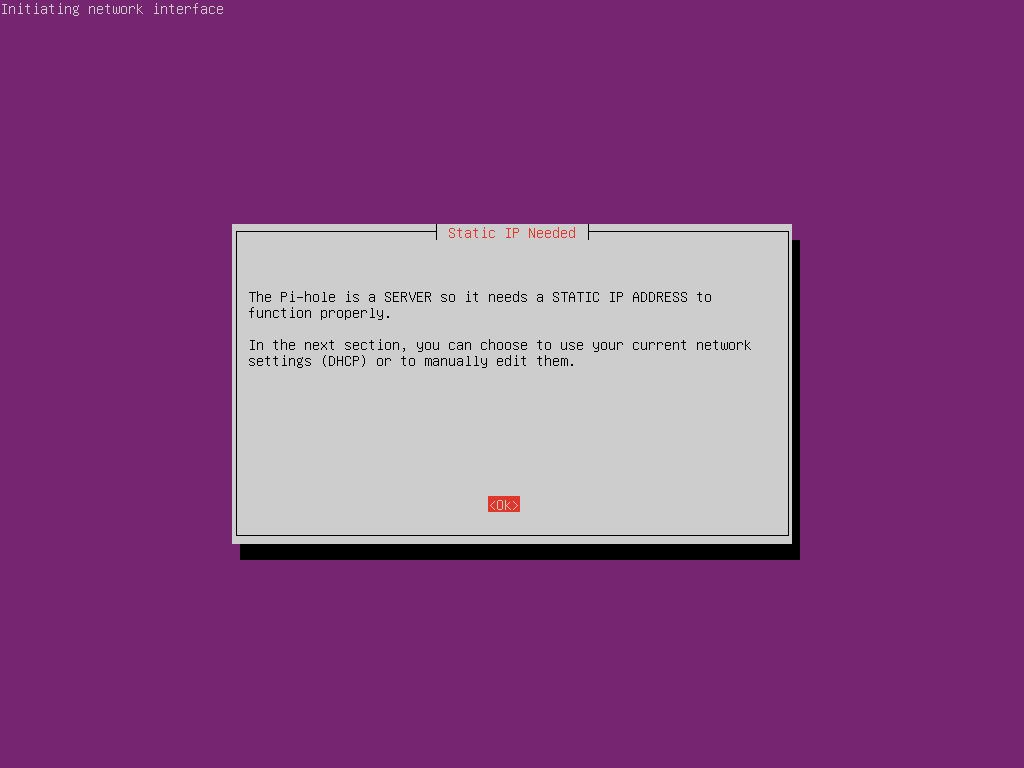
Press return to go through the next couple of screens. You will then come to a warning about requring a static IP address
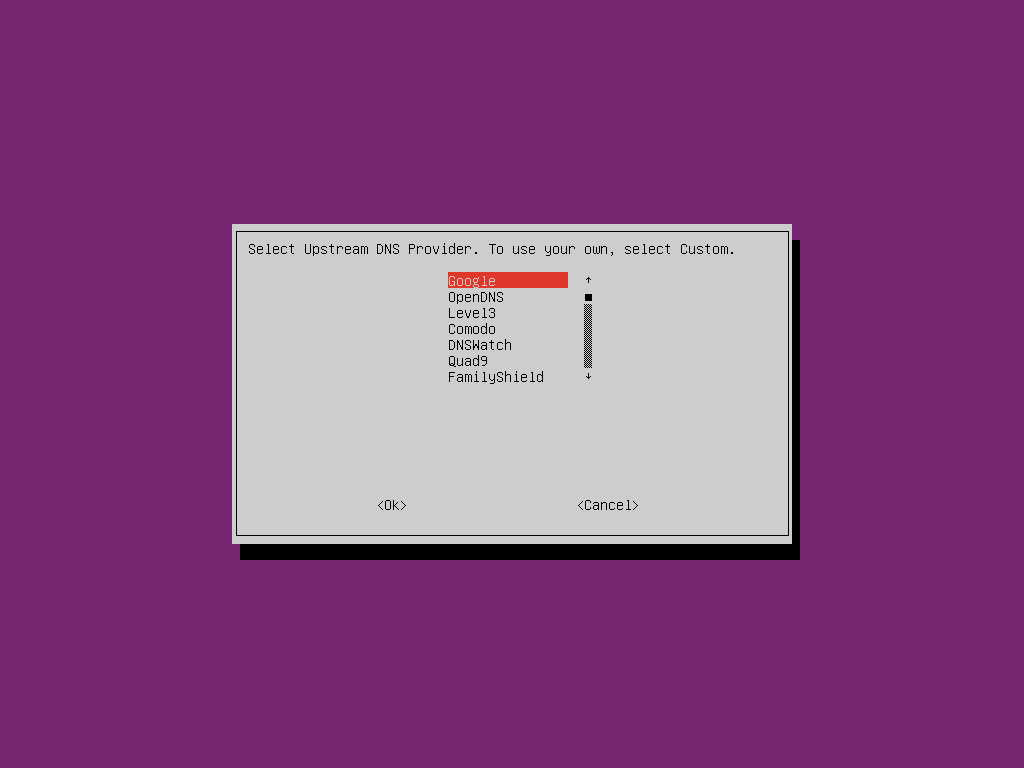
You will then be asked to select an upstream DNS provider. This is the service Pi-hole will connect to when looking for DNS records for sites it is not blocking You can pick any of them or select “Custom” to enter any other DNS server you choose. For this guide I will use Google’s DNS servers
You will now be asked to select blocklists to use. We will leave all of these enabled for the time being as between them they will block most advertising, tracking and malware domains but if you want to see ads and just block other content such as malware you could disable some of these lists. They can be disabled or re-enabled after the setup is complete using the web interface.

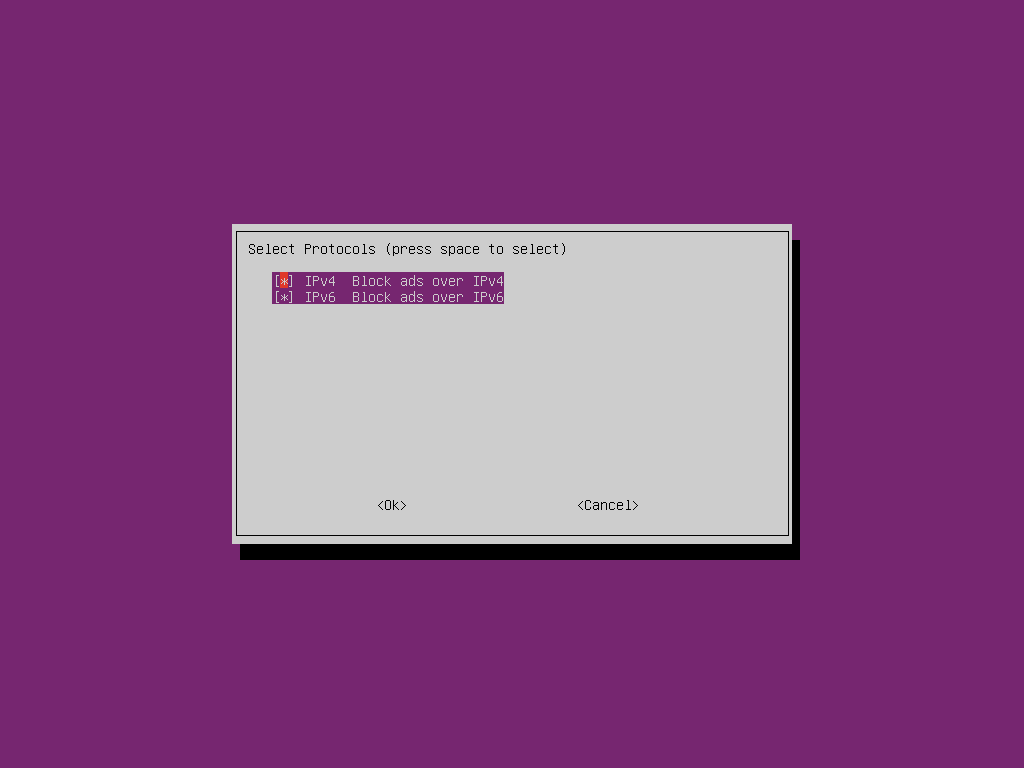
Select OK to block content on both IPv4 and IPv6. It is unlikely that you would wish to change this setting.
You will now be prompted to configure your IP address. The installer will ask you if you want to configure your current IP address as a static address. If you choose yes, you should set a DHCP reservation on your router to prevent other devices being assigned that address. In this case we will set a new static IP outside of the DHCP range.
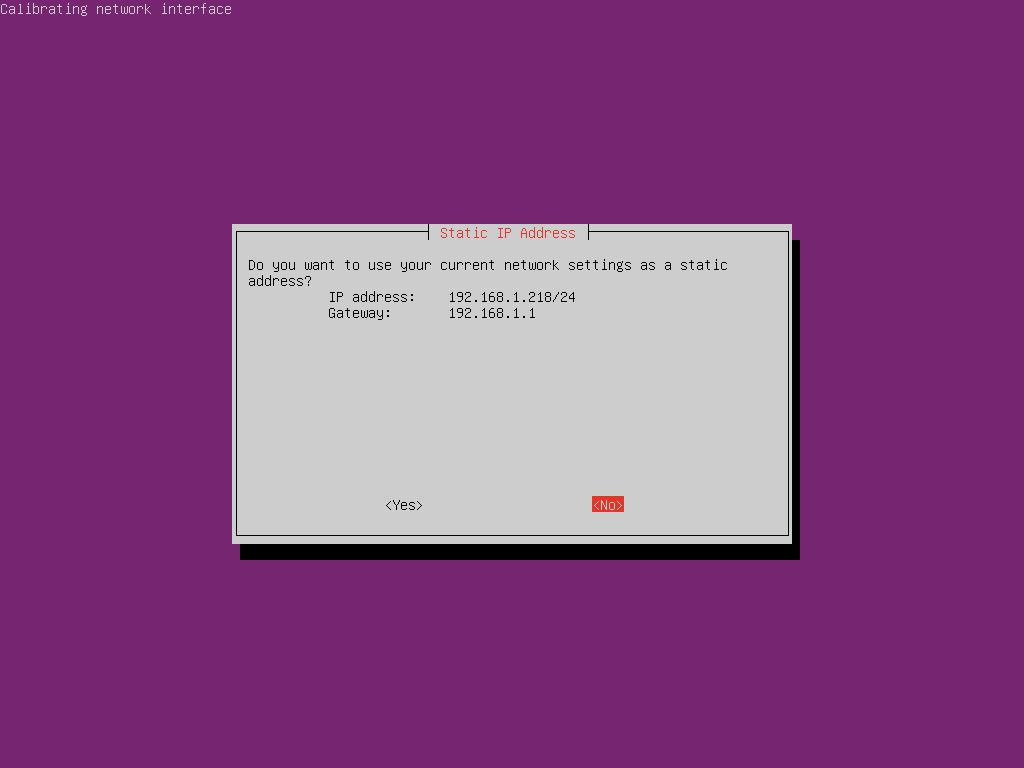
On my network the DHCP server hands out addresses between 192.168.1.100 and 192.168.1.254 so we will need to pick an address outside of this range that is not statically assigned to another device

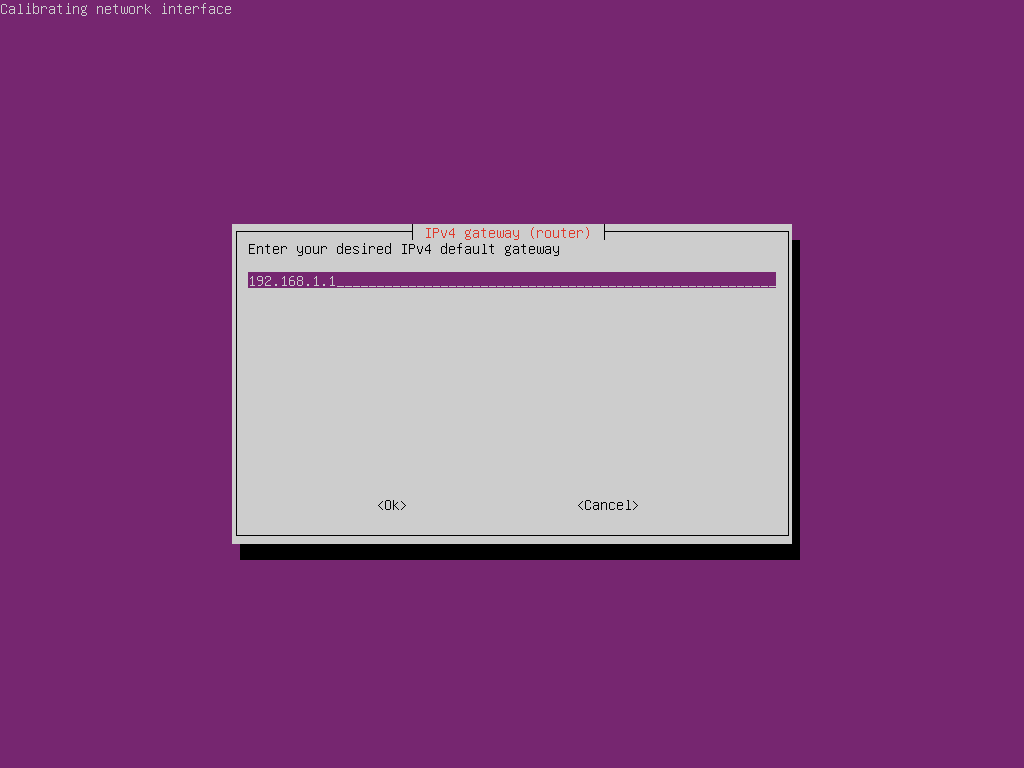
We will then be prompted to choose a default gateway (router address). The one provided by DHCP is almost certainly correct so you can probably just select “OK” but check it just in case
Confirm your network settings are correct

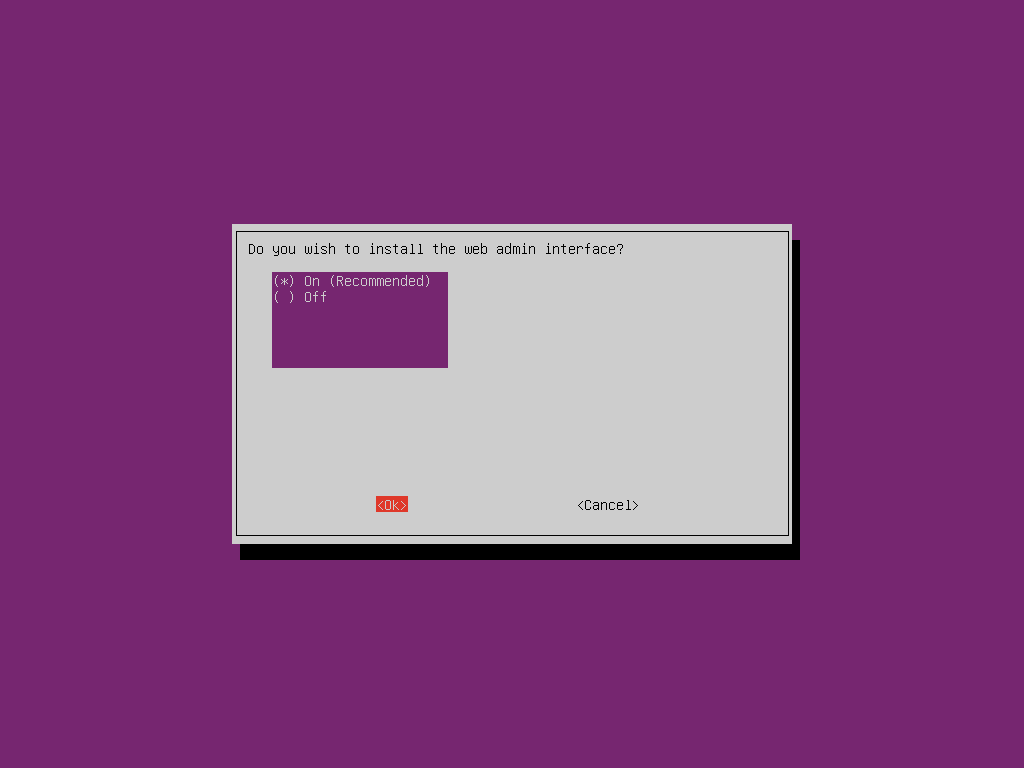
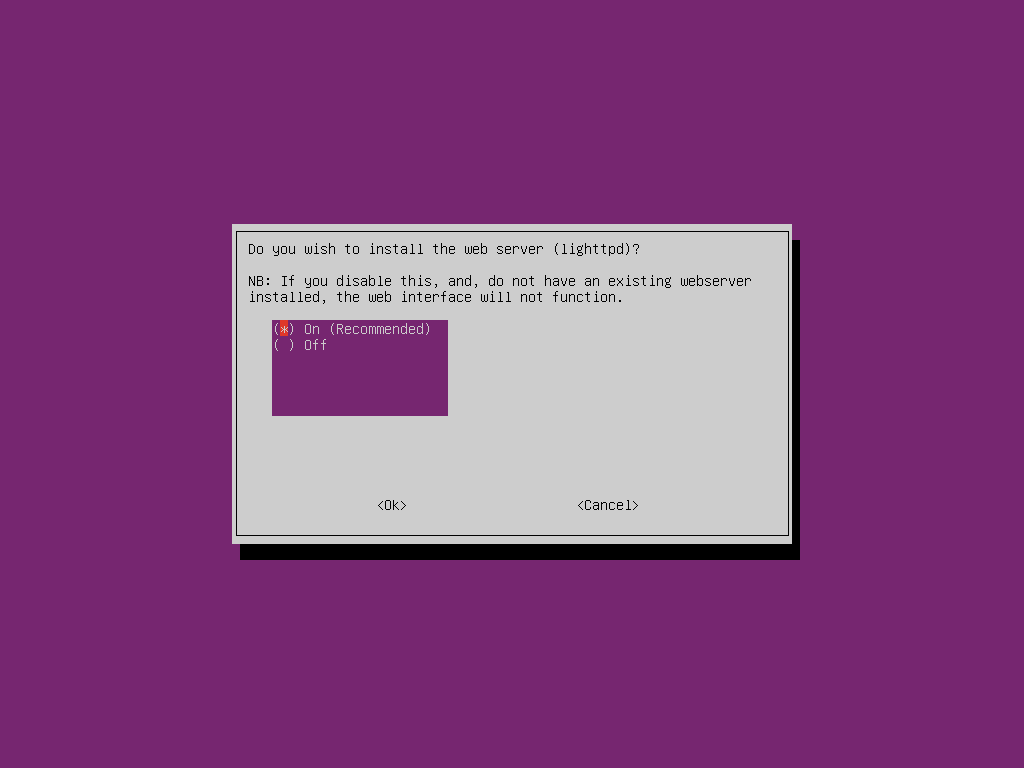
You will next be asked if you wish to install the web admin interface. While it is possible to control Pi-hole from the command line most users will wish to enable this option as the graphical interface is simpler, uses few resources and provides graphs and metrics which may be useful for monitoring which content is being blocked. You will then be asked to install a web server, say yes to this if you don’t already have one installed.
You will next be asked if you want to keep a log of the queries. While this can be useful for troubleshooting and enables certain metrics which may be useful for monitoring your network it will allow you to see the sites that your users are visiting so make sure you ask permission before doing this as people may find it invasive and failing to disclose that you are doing it in a corphttps://davidshomelab.com/wp-content/uploads/2019/0orate environment will put you in breach of data protection laws in many parts of the world. I will enable it for this guide.

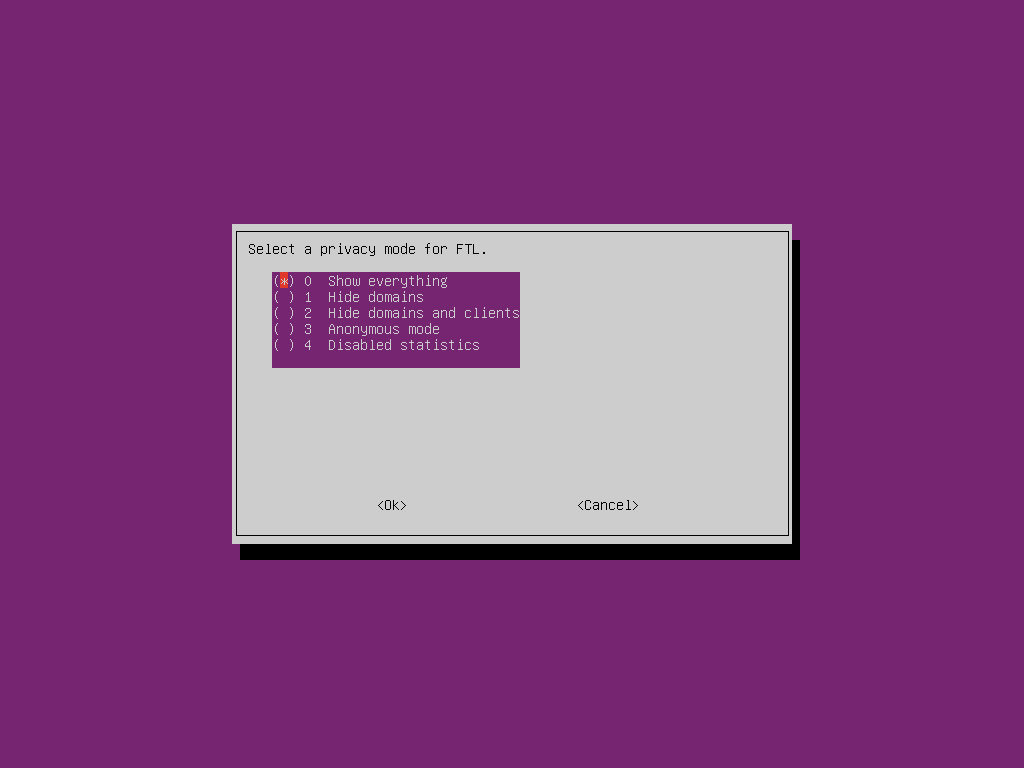
We are now asked to select a privacy mode for the logs in the web interface. While all data will be logged as we have enabled logging, it is possible to hide certain information from the web interface. For example, we may choose to see when a client makes a request but hide the domain they are looking up from the logs, or record that a request has been made but hide both the client and the domain. We can also hide all statistics if we want but this will disable all metrics for tracking the number and type of requests we are processing. To be able to demonstrate the full power of the web interface I will choose to show everything
We have now entered all of our settings so Pi-hole will now install. The install will take a few minutes but this may vary depending on the speed of your internet connection
Once the installation is complete you will receive a screen showing your default password for the web login and the settings you will need to configure to make your PCs request DNS from the Pi-hole. While it is possible to manually set the DNS server on each PC you wish to use, you will probably want to set your Pi-hole as the default DNS provider on your router so it will automatically be configured whenever a device connects to your network
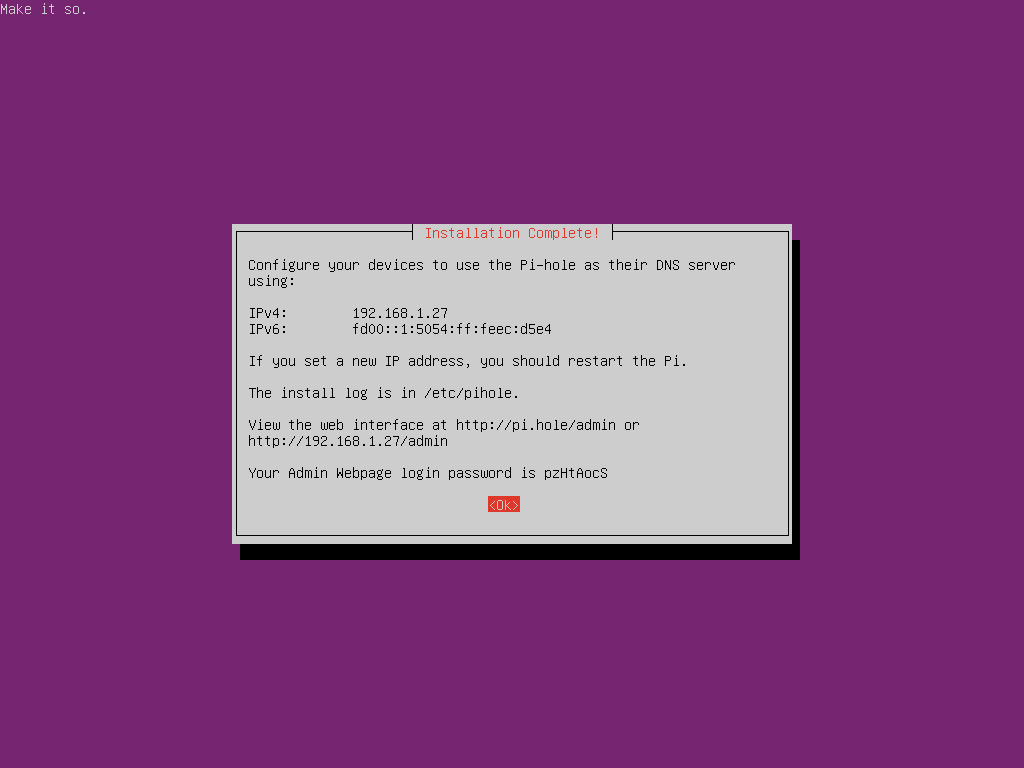
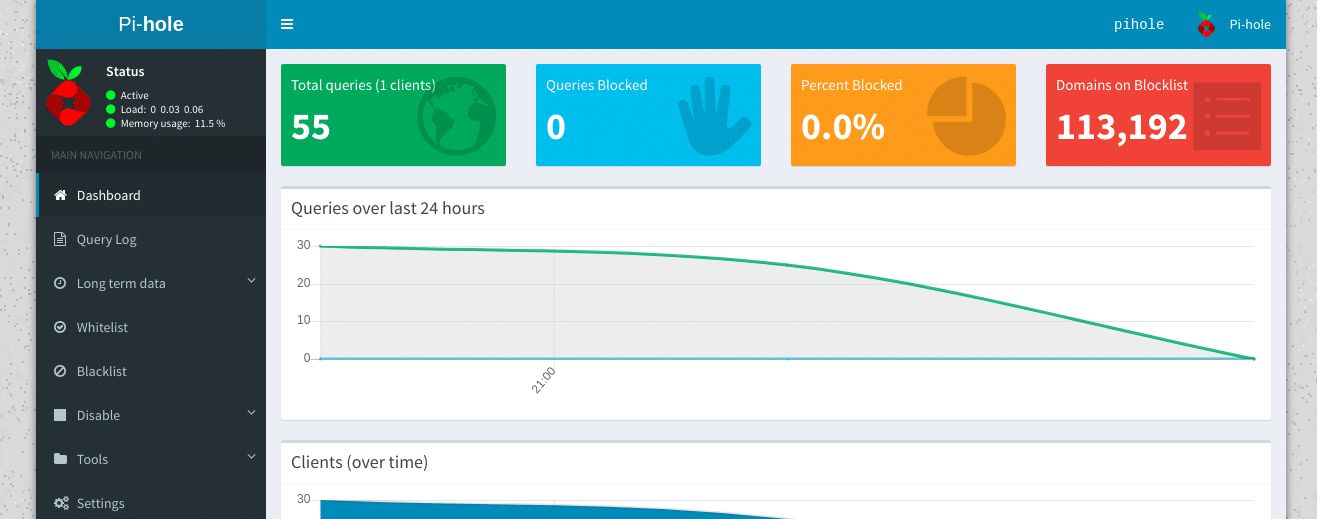
Now the installation is complete we can check the web interface is active and that we can log in. Just go to the address of the Pi-hole admin console in a web browser. In our case this is http://192.168.1.27/admin but make sure to change the IP address to the one you set for yours
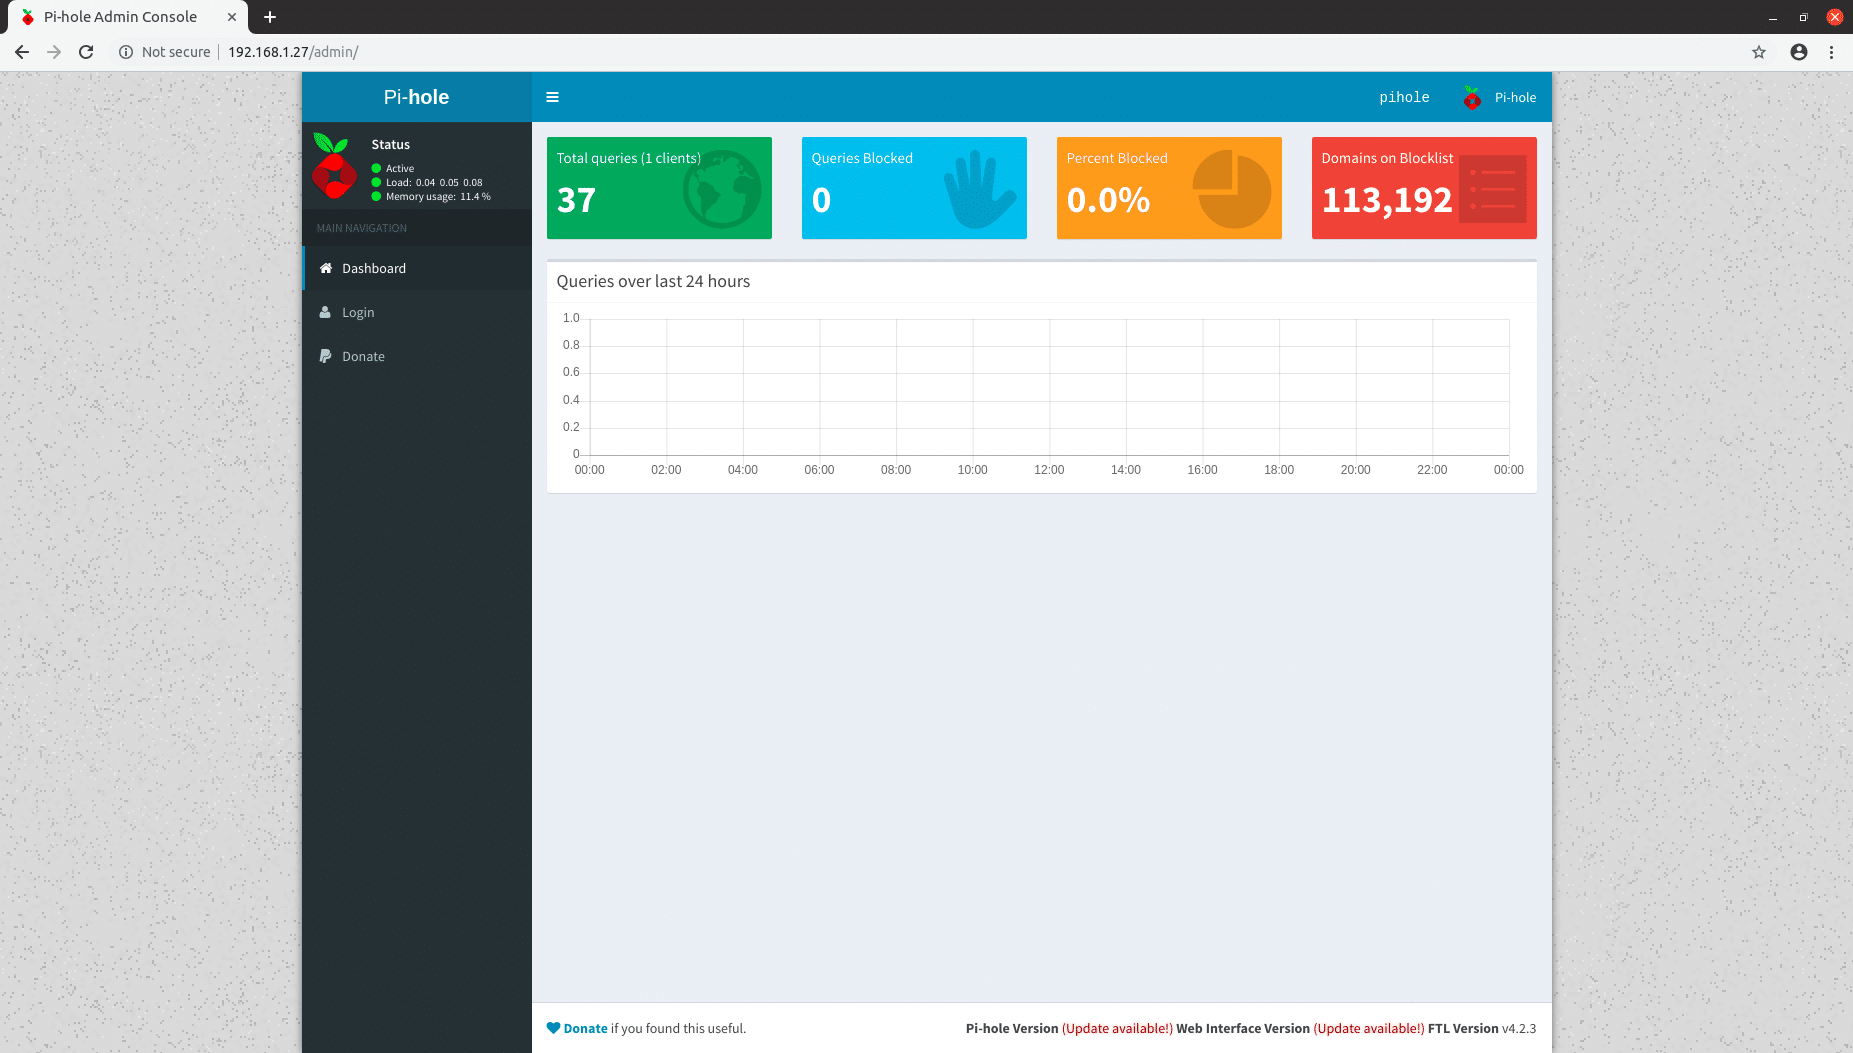
We can then log in with the password shown in the installer to see graphs and metrics of the queries we have processed. This will be fairly dull at this point as our only client is the Pi-hole server itself but will become more interesting once we add clients.
Adding clients to our Pi-hole
Clients can be added in 2 ways. We can either add them one at a time by configuring the DNS server on each client or by telling our router to advertise the Pi-hole as the DNS server clients should automatically use. The way to do this will vary significantly depending on your router but you should find the settings somewhere in the DHCP settings in your router’s admin console. If you get stuck you will probably find instructions by entering “change DNS server on [insert model of router]” into your favourite search engine.
Your Pi-hole should now be fully set up and start blocking ads and other undesirable traffic on your network. You can test this by going to https://ads-blocker.com/testing/. If your Pi-hole is working correctly you shouldn’t see any ads on this page. If you do see ads your PC may not be getting its DNS from the Pi-hole so you may have configured your router incorrectly or you may need to disconnect from the network and reconnect to get the updated configuration. You can run “nslookup somedomain.com” to verify which DNS server your PC is currently using.