It’s been several months since I first started planning the homelab upgrade but I’ve finally got round to making the first steps. The initial step was to replace my Ubuntu based hypervisor with Proxmox. As the rest of my home network runs on the same host I couldn’t afford to leave it offline for long. This required me to do some careful planning to ensure a quick and smooth transition. One of the main focuses behind the upgrade was to increase separation between home and lab infrastructure. This means that the rest of the upgrades should be a lot quicker and less disruptive to implement.
As mentioned in my last post I decided to go with Proxmox. While there are plenty of other options out there, I found Proxmox to be the simplest to run on a single host while also maintaining clustering ability. I also like the built in backup capabilities. The fact that it’s based on Debian is also an appeal as it’s a platform I am already familiar with. I’d prefer not to have to rebuild the server again for the life of the hardware. Having a stable and reliable base platform is therefore a priority.
Planning For The Move
My key priorities during the move were to keep the internet up as much as possible and to not lose data. For the first part, I built a new router VM on my spare (and very noisy) Supermicro 6017R. I chose to use VyOS for this and was sufficiently impressed with it that it has now replaced pfSense as my main router OS. I’ll have a lot more to say about it in future posts.
I do eventually want to rebuild all my home infrastructure and move more services into containers. However, for now I just wanted to move everything over as-is. I can then tackle one service at a time after researching the best options for each situation.
The migration process actually turned out to be much simpler than I expected. Initially I powered down the VMs and copied the contents of /var/lib/libvirt/images onto an external hard drive. I would then later import these into newly created VMs after migrating to Proxmox.
Installing Proxmox
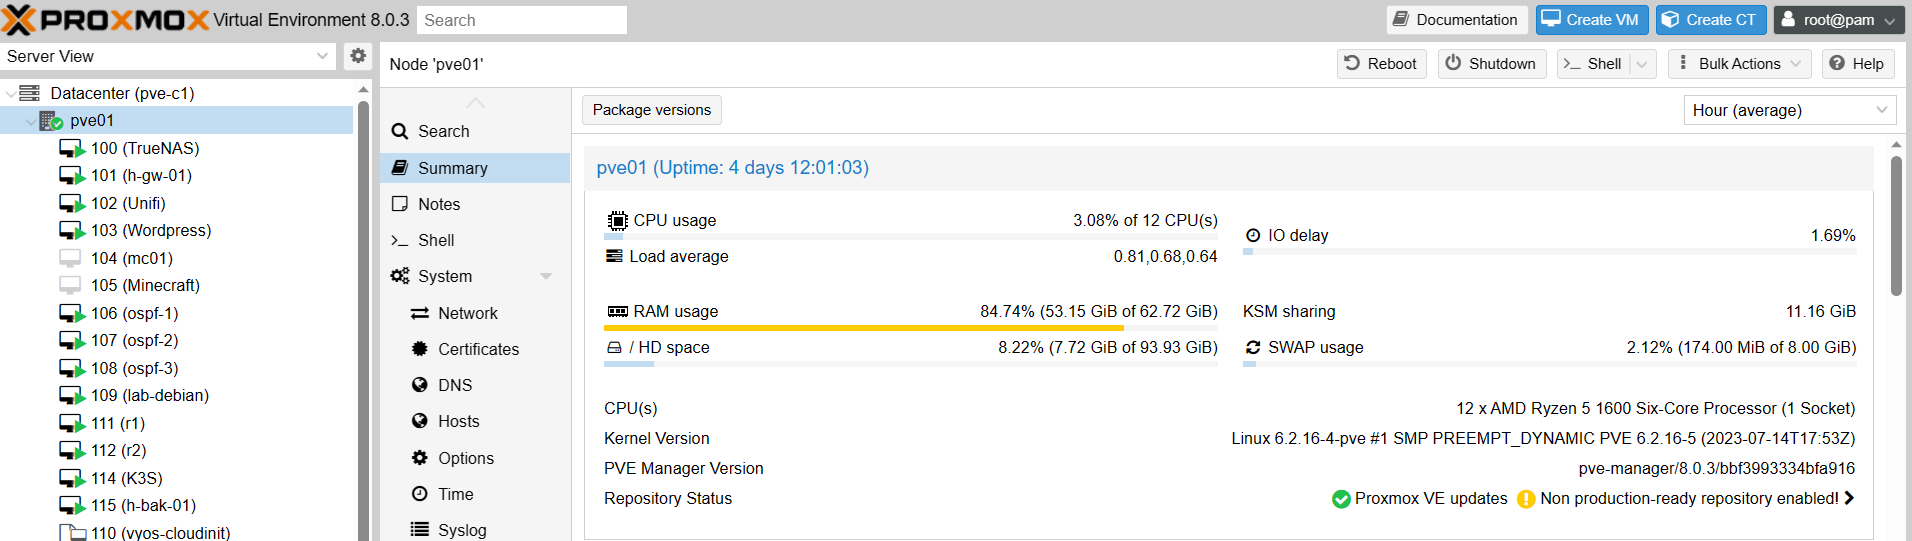
The Proxmox installation process is pretty typical for any Linux installation, just download the ISO, write it to a USB drive and boot from it. You’ll just need to select your boot drive, set a root password and configure a static IP address. Once you boot into the new installation, the console will show the IP/port combination for the web interface.
Configuring Proxmox updates
By default, Proxmox will expect an enterprise subscription and will have the enterprise update repo enabled. In a production environment, a subscription is highly recommended to get access to more thoroughly tested packages and support. For a homelab this is overkill so we need to enable the community repo. In the node settings go to Updates > Repositories. You will see two repositories under the enterprise.proxmox.com domain. Select these repositories and disable them. Next, click Add and click OK to the warning that you don’t have a subscription. Select “No-subscription” and click OK. In the updates tab, click Refresh and Upgrade. Once the updates are installed, reboot the host.
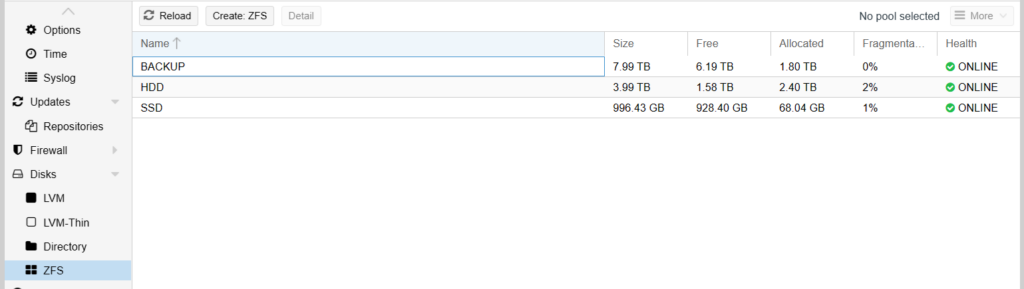
Creating Storage Pools
Once you have signed back in to the web interface, you’ll want to create some storage pools. Proxmox will create a pool automatically on your boot disk. However, storing VMs on separate disks will make life easier in the event that you need to reinstall. I have 5 additional disks in my host, two 1TB SSDs, two 4TB SATA HDDs and one 8TB HDD. I used the 1TB disks for a mirrored ZFS pool for VM boot disks. Then I did the same with the 4TB disks for bulk storage. This can be used for any archival data and for VMs which require a lot of space. The 8TB disk will be used for backup storage. Unfortunately I don’t have enough SATA ports to add a second mirror for this disk so can’t make this redundant. That is something I’d definitely look to reconsider for the next hardware iteration.
Configuring the Network
Next, I set up the network configuration. As the router will be running as a VM, I needed to make a WAN and LAN bridge. I could have used the existing vmbr0 interface as the LAN but in the future I may want to move the management interface to a dedicated vlan. To retain flexibility, I created a separate LAN bridge. I also made a separate Lab bridge to keep any lab traffic well away from anything important. I didn’t add any uplinks for this bridge as it will only be communicating with other VMs.

Separating Resources
One of my main aims for the homelab rebuild was to have plenty of separation between home infrastructure and lab. One way to do this is to have separate resource pools. This creates a simple way to have different permissions for different types of VMs. This will come in particularly handy if I want to experiment with automation in the Proxmox environment. I can create an account which only has permission to touch lab VMs and be confident it wont touch infrastructure. Resource pools are configured in Datacentre > Permissions > Pools. I created two pools, Home and Lab.
Importing Existing VMs to Proxmox
I had worried about importing the existing VMs but it turned out to be far simpler than I expected. I had only copied the disk images so had to re-make the rest of the VM config.
To do this I created the VMs as normal through the web UI. As we already have the boot image, on the OS tab I selected “Do not use any media”. On the Disks tab I deleted the default scsi0 device. I configured the CPU, memory and network as appropriate for the particular VM.
Import the Disk
Once the VM was created, all we need to do is import the disk images. I plugged in the external drive and checked the device name in the node disk settings. In my case it came up as /dev/sdg I hadn’t partitioned it so this was the location I needed to mount. I went to the shell tab and mounted the disk as follows:
mount /dev/sdg /mntWe then need to import the image into the VM which we can do as follows:
qm disk import <vm id> <image path> <storage pool>
The disk import process will make a copy of the image to the storage pool. It will create it as a new disk so don’t worry about overwriting any existing disks. Depending on the image size and storage speed, the import may take a while. If you use the shell interface in the web UI, navigating away from the shell will cancel the import. You may find it easier to run the commands over SSH or use the nohup command if you have large disks to import.
Attach the Disk
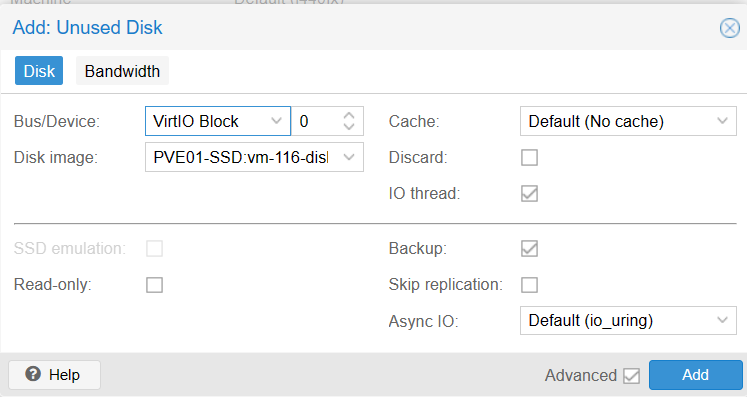
In the VM settings, you should now see an unused disk in the Hardware tab. Click on this disk and click Edit. If it is a Linux VM, change the Bus/Device setting to VirtIO Block for improved disk performance. Windows requires additional drivers to support VirtIO so if you don’t have them installed, stick with one of the other options. Once you are happy with the settings, click Add.
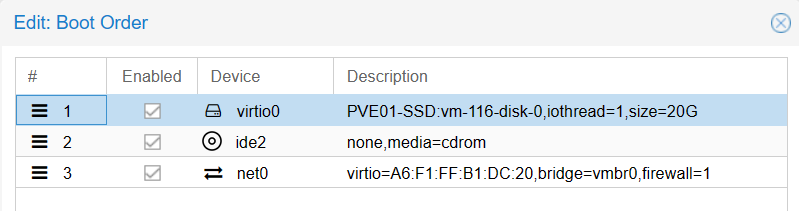
Go to the Options tab and double click on Boot Order. You should now see your new disk at the bottom of the list. Check the box to enable the disk and drag it to the top of the list. You are now ready to boot the VM.
For now I have significantly scaled back what was running so I just have a router, UniFi controller and file server. I will probably add PiHole back at a later date but for now I want to keep things simple. I also made the decision to not host email at home any more. It’s stressful enough having to manage mail servers at work and I don’t want to have to do it at home too. Hosting email in the cloud should mean it’s online more often. If you’ve sent me an email and got a delivery failure, I’m sorry and this shouldn’t happen in future.
Next steps
So far I have got to the point that my existing infrastructure is running on a more manageable platform, this will make it easier to make incremental changes later so expect more updates in future. I have already replaced my pfSense router with VyOS and implemented the Proxmox Backup Server but this post is long enough already so these will be covered in future updates.