When people start out with coding it is common to use print statements to investigate program state. This can be helpful as a quick way to check the value of a variable at a given point. However, as your project begins to grow this approach becomes difficult to scale. If a program is producing a lot of output or runs for a long time you may want to write the output to a file instead of the console. This will allow you to investigate the output at a later date and search for specific keywords. Additionally, the level of required detail changes depending on the point in the project lifecycle. All of these problems can be solved using the logging module.
When you first develop a feature you may want a lot of information about its state. Later, when it matures, you may only want to see serious errors and skip events that are purely informational. At this point we then comment out the print statements, and re-enter them the next time there is a bug and we want detailed output. This leads to the possibility that important messages could be commented out or informational messages could be left in, leading to messy output.
We can use the logging module set up custom event handlers to control which locations we log events to. For example, we may want to send all messages to a file but only send significant errors to the console. At a later date we may find a bug and want to output detailed debug messages. We can do this by making a small configuration change instead of un-commenting hundreds of lines of code.
The logging module has a lot of features and I will not cover all possible uses here. Instead, I will provide a general overview that you can adapt to implement basic logging functionality in scripts.
Using the logging module to generate log messages
The logging module provides the capacity to create multiple logger objects each with different properties, allowing for flexibility over the routing of log messages. Alternatively you can call the logging class directly to use the root logger. We can start using the logging module to print a message to the console using the default settings of the root logger as follows:
import logging
logging.error("this is a test log message")
When we run this code we get the output on the console:
ERROR:root:this is a test log messageThis message shows the severity of the message (ERROR), the name of the logger (root) and the message to output. If we wanted to create a secondary logger we could use the GetLogger method:
logging.getLogger("CustomLogger").error("This is an error message sent to a custom logger")ERROR:CustomLogger:This is an error message sent to a custom loggerWe can also assign a custom logger to a variable to simplify calling it in future:
myCustomLogger = logging.getLogger("CustomLogger")
myCustomLogger.error("This custom logger is mapped to a variable")
Handling different logging severity levels
So far we have just generated log messages with a severity level of “ERROR”. There are 5 default severity levels, “DEBUG”, “INFO”, “WARNING”, “ERROR” and “CRITICAL”. We can use each of these levels by using the appropriate method of the logging module. In the following example we generate a log message with each severity level.
logging.critical("this is a test CRITICAL message")
logging.error("this is a test ERROR message")
logging.warning("this is a test WARNING message")
logging.info("this is a test INFO message")
logging.debug("this is a test DEBUG message")
When you run this code, you see that not all of your messages appear on the console:
CRITICAL:root:this is a test CRITICAL message
ERROR:root:this is a test ERROR message
WARNING:root:this is a test WARNING message
We only get messages with a severity greater than or equal to WARNING but our INFO and DEBUG messages are ignored. This is because by default the logger object has a severity level set to WARNING. We can customise this level at the root logger object and at the handler level (more on handlers later) but the message must match the severity level for both the logger and the handler. For example, if we set the logger to “WARNING” and the handler to “DEBUG”, the handler would still only receive WARNING or higher.
We can use the setLevel method to change the severity level for the logger object:
logging.getLogger().setLevel("DEBUG")
logging.critical("this is a test CRITICAL message")
logging.error("this is a test ERROR message")
logging.warning("this is a test WARNING message")
logging.info("this is a test INFO message")
logging.debug("this is a test DEBUG message"
Now the output contains all messages:
CRITICAL:root:this is a test CRITICAL message
ERROR:root:this is a test ERROR message
WARNING:root:this is a test WARNING message
INFO:root:this is a test INFO message
DEBUG:root:this is a test DEBUG message
This now means we can adjust the severity of messages we receive without needing to comment out any print statements, we just need to adjust the parameter in our call to SetLevel and the change will take effect throughout our code.
Redirecting logging module output
So far we have just looked at printing log output to the console but the logging module provides various handlers to redirect the output. For example, we could write the output to a file, a syslog server or even to email. We can also customise the severity of logs that go to different locations and the level of detail that goes in to the logs. For example, we may want only errors to appear on the console but all detail to appear in the log file. We may also want critical alerts to generate an email message or we might want the log file to contain timestamps that do not appear in the console.
Outputting to a file
We create handlers by creating a new handler object and assigning it to the logger object. For example, we could create a new file handler and set its severity level to INFO as follows:
filehandler = logging.FileHandler("test.log")
filehandler.setLevel("INFO")
We can then assign that handler to our logger object:
logging.getLogger().addHandler(filehandler)If you are not using the root logger then you will need to specify the name of the logger as a parameter to the getLogger method. If you have assigned the logger object to a variable you can also use the name of that variable to reference the object. For example:
mylogger = logging.getLogger("ExampleLogger")
mylogger.addHandler(filehandler)
If we now run our example code we will see that it does not print anything to the screen. Instead, we can find a file called test.log which contains:
this is a test CRITICAL message
this is a test ERROR message
this is a test WARNING message
this is a test INFO message
Outputting to the console
The reason we don’t see anything on the screen is because the logging module only creates a default stream handler if there are no other handlers. If we want to have a stream handler as well as a file handler then we must explicitly define both. The method for adding a stream handler is similar to adding a file handler:
streamhandler = logging.StreamHandler()
streamhandler.setLevel("WARNING")
logging.getLogger().addHandler(streamhandler)
If we run this now we get
this is a test CRITICAL message
this is a test ERROR message
this is a test WARNING message
printed to the console and
this is a test CRITICAL message
this is a test ERROR message
this is a test WARNING message
this is a test INFO message
appended to test.log. The INFO message is skipped from the console as we only care about WARNING or higher.
Controlling disk usage when logging to a file
There are several different types of handler which I will not cover here as the aim is to provide a general overview but the full details of all handlers are in the module documentation. One handler I will mention here is the rotating file handler. This works similarly to the file handler we have discussed previously but also allows us to delete stale log files.
Suppose your application continuously generates log messages and never deletes them. Eventually the logs will end up taking up a significant amount of space and may even become impossible to open. The rotating handler specifies the maximum size a log file is allowed to reach before a new one is created. We can also specify how many historical log files to keep before deleting the old ones.
To use the rotating file handler, along with the other advanced handlers, we also need to import the logging.handlers module. This is in addition to the main logging module:
import logging.handlersWe can now define our handler as follows:
rotatingfilehandler = logging.handlers.RotatingFileHandler(
    "Rotating.log",maxBytes=1024,backupCount=3)
rotatingfilehandler.setLevel("DEBUG")
logging.getLogger().addHandler(rotatingfilehandler)
This handler will output to a file called Rotating.log and will archive the file whenever it reaches 1kB in size. When the handler rotates a file, it increments a number at the end. For example, when the file is rotated once, the logger will rename it to Rotating.log1, then to Rotating.log2 etc. We have set it to retain 3 archived copies.
As we do not need to worry about the log filling up the disk space we can, if we choose, store all detail including DEBUG messages. RotatingFileHandler and FileHandler are not mutually exclusive. If you wanted to save informational messages to a log that gets rotated but save ERROR and CRITICAL to a secondary log file that is never replaced, you could use both types of handler at the same time. This is the same as how we used both FileHandler and StreamHandler in the previous example.
Formatting logging output
You may recall from our first example, that the log messages we generated didn’t just contain the message. They also showed the severity and the name of the logger object that generated the message.
We can control how to display messages by using formatters. These specify the extra information that should go in to a log message. As we assign the formatter to a specific handler, not to the overall logging object, we can specify different format options for each handler. For example, we may want to show a timestamp in the log file but not on the console.
Formatter objects are created as strings containing placeholder variables for specific data. You can find a full list of all the possible variables here. For a simple example, suppose we wanted the log file to contain the timestamp, severity level, and log message and the console to just show the severity and the message. We could do:
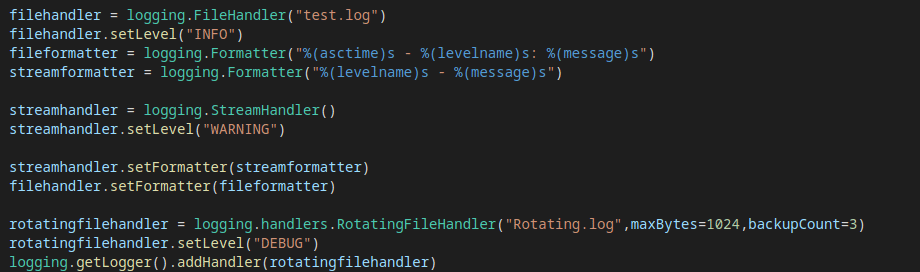
fileformatter = logging.Formatter("%(asctime)s - %(level)s: %(message)s")
streamformatter = logging.Formatter("%(level)s - %(message)s")
streamhandler.setFormatter(streamformatter)
filehandler.setFormatter(fileformatter)
If we now generate some example log messages we can see the following on the console:
CRITICAL - this is a test CRITICAL message
ERROR - this is a test ERROR message
WARNING - this is a test WARNING message
And this in our log file:
2021-08-14 13:14:50,731 - ERROR: this is a test ERROR message
2021-08-14 13:14:50,731 - WARNING: this is a test WARNING message
2021-08-14 13:14:50,731 - INFO: this is a test INFO message
Next steps
We have now seen how to generate logging messages and filter by severity level. We have also seen how to redirect our log messages to a file while also ensuring high priority messages are still visible on the console. I hope this should be enough to gain a general understanding of how the logging module works, allowing the reader to research the more advanced features directly from the library documentation. By using logging instead of print statements to provide feedback on the operation of our code we make it more maintainable and easier to home in on the specific information needed when investigating bugs.