If you have followed my previous guide on setting up a FreeIPA domain you will now have a single FreeIPA server handling all requests. For smaller deployments this is unlikely to overload the server but it does create a single point of failure as, were this server to go down for some reason, clients would be unable to authenticate, resolve DNS, generate certificates or update policies. Furthermore, in the event of a complete system failure, you would need to restore the server from backup which can cause issues for time-sensitive applications like Kerberos. We can resolve both of these issues by adding multiple IPA servers to our domain. By doing this, load can be shared between the servers and you will be able to take a server down (e.g. to do updates) without impacting the domain’s ability to respond to client requests.
Provisioning a second instance
As with our initial server, we will want to provision a CentOS 8 physical or virtual server with at least 4GB of RAM. If you are running as a virtual machine, you may want to consider running it on a different host to your other server to provide redundancy in the event of a host failure but many of the benefits can be achieved even if both run on the same physical host.
As this is a server we should give it a static IP address as follows:
nmcli con showMake a note of the connection name, in this case “System\ eth0” to use in the following list of commands. Make sure to configure DNS to point to your existing IPA server.
nmcli con mod System\ eth0 ipv4.address 172.16.24.6/24 (change this to the actual IP you plan to use)
nmcli con mod System\ eth0 ipv4.gateway 172.16.24.1 (change this to your actual default gateway)
nmcli con mod System\ eth0 ipv4.dns 172.16.24.5 (set this to the IP address of your existing FreeIPA server)
nmcli con mod System\ eth0 ipv4.method manual
nmcli con up System\ eth0
We will also need to set a hostname for our server. As my previous one was ipa1.internal.davidshomelab.com it makes sense to call this one ipa2.internal.davidshomelab.com. You can call yours whatever you like but make sure the domain suffix (in this case internal.davidshomlab.com) matches whatever you picked as your domain suffix for the initial setup.
hostnamectl set-hostname ipa2.internal.davidshomelab.comInstall FreeIPA packages
As we will be installing FreeIPA server packages we will need to enable the IDM appstream repo:
yum install @idm:DL1This will install the IPA client utilities and give us access to the server utilities that we will need. We install these as follows:
yum install ipa-server ipa-server-dnsJoin server to domain
Before we can promote the server we need to join it to the domain, we do this in the same way we would join any other client to the domain:
ipa-client-install --mkhomedirOnce it is joined, we will need to add it to the ipaservers host group. This can be done either through the command line or the web interface. If you are running it from the command line, log in to your current IPA server as an admin user and run the following command:
ipa hostgroup-add-member ipaservers --hosts ipa2.internal.davidshomelab.comTo verify that this has been successful run the following command:
ipa hostgroup-show ipaserversYou should see output similar to the following. Ensure that your new server is listed under Member Hosts
  Host-group: ipaservers
  Description: IPA server hosts
  Member hosts: ipa1.internal.davidshomelab.com, ipa2.internal.davidshomelab.com
Finally, we will need to ensure all the required firewall ports are open, these are the same ports as on our original IPA server so run the same command as we ran on that:
firewall-cmd --add-service=http --add-service=https --add-service=ldap --add-service=ldaps --add-service=kerberos --add-service=dns --add-service=ntp --add-service=kpasswd --permanent
firewall-cmd --reload
Promote the server
Run the following command to install the IPA server and configure it as a replica:
ipa-replica-install --setup-dns --forwarder=8.8.8.8 --forwarder=8.8.4.4 --setup-caBy adding these additional flags we also configure the server to be a DNS server and Certificate Authority. You can optionally omit these if you don’t want these roles. As our aim is to provide redundancy in the event that one of the servers fails, we should configure it to have the same roles as our primary server.
Set your DNS forwarders to match whatever is configured in your current IPA server, don’t use the --auto-forward flag as this will forward DNS queries to the existing IPA server, meaning that it remains a single point of failure.
If all is well and we haven’t made any configuration errors the installation will now proceed. It will take some time to complete, especially if you are adding the Certificate Authority role or if you have a lot of records in your ldap database so just leave it to run until you see the line The ipa-replica-install command was successful.
Test that everything’s working
Once everything is installed, attempt to access the IPA console via a web browser. You should see a login screen and be able to log in with your admin user account. Make a test user from your new server and log in to a client from it. It is important that you make a new user when you add a new server due to the way FreeIPA hands out available UIDs to its member servers. The first server you create will generate a range of 200,000 UIDs to be used when a user is created. When another server is added, it will give half of its range to that server at the point when a user is created. This means that if we were to remove ipa1 without ever having created a user on ipa2, we would find ourselves in a situation where ipa2 had never been given any UIDs and could therefore not create a user. When we look at our new user (test2), we see that the UID is significantly larger than for our existing users, meaning that our new server has been allocated a pool which it can use to create new users in future.

We will also need to test that DNS is working as expected. You can do this by running an nslookup command set to point at the new server. Test for something inside your IPA DNS zones and something outside. For example:
nslookup ipa1.internal.davidshomelab.com 172.16.24.6Server: 172.16.24.6
Address: 172.16.24.6#53
Name: ipa1.internal.davidshomelab.com
Address: 172.16.24.5nslookup davidshomelab.com 172.16.24.6Server: 172.16.24.6
Address: 172.16.24.6#53
Non-authoritative answer:
Name: davidshomelab.com
Address: 46.101.61.106
Name: davidshomelab.com
Address: 2a03:b0c0:1:d0::1b:b001Once you have verified that DNS is working, update your DHCP server to give out your second IPA server as its secondary DNS server and update the DNS settings on any servers with static IP addresses.
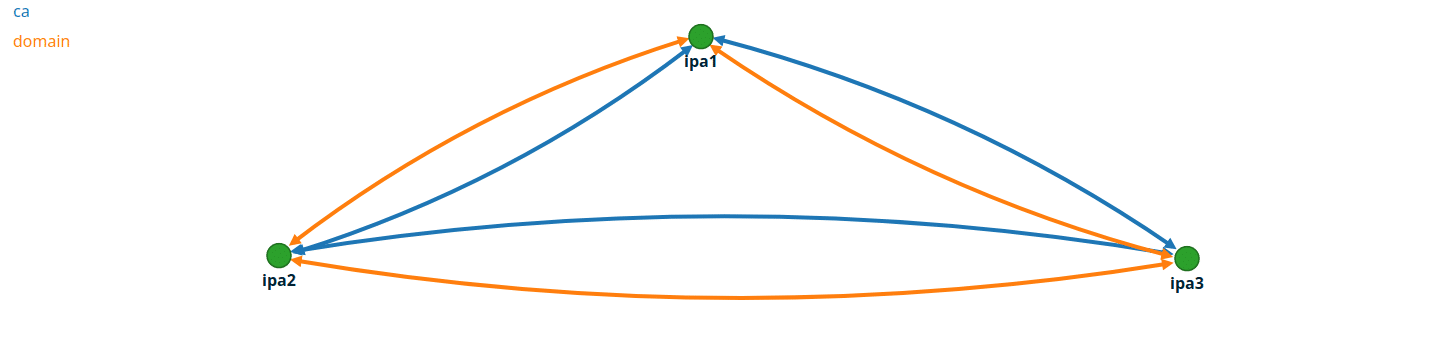
A note on replication topology
This process can be used to add as many IPA servers as you need but if you are adding more than 2, pay attention to the replication topology. You’ll want to have sufficient links between servers that any server failing will not block replication across the rest of the domain. You can find the required settings in the web console under IPA Server > Topology > Topology Graph