
Last week Nextcloud released version 17.0.2. While the X.0.2 release doesn’t have as many flashy new features as the first couple of releases in a major version it typically marks the point at which the Nextcloud team consider the release stable for production. For that reason it is sensible to hold off on feature updates until this point. Fortunately updating Nextcloud is typically a fairly simple and painless experience.
Preparing to update
The most important thing to do before updating is to create a backup. There are a few ways this can be done, if you are running Nextcloud in a virtual machine you can just create a snapshot of the VM. If you are running on a physical server, the two things you need to back up are the webroot and the database.
The first step is to enable maintenance mode, this stops users from logging in to Nextcloud and reduces the risk that anything will change while you’re running the backup, leaving the installation in an inconsistent state in the event that you need to restore. You can enter maintenance mode by running the following command:
sudo -u www-data php /var/www/html/nextcloud/occ maintenance:mode --on
Note that this must be done as the user the web server runs as. The above command will work for Ubuntu but if you are using a different distribution the web server user might not be “www-data” so you will need to adjust accordingly. If you are unsure, run ls -l /var/www/html/nextcloud and see who owns the files. Additionally the occ program is in the Nextcloud webroot so if you have installed Nextcloud somewhere other than /var/www/html/nextcloud you will also need to adjust this part of the command
Once you have run this command go to your Nextcloud URL in a browser and verify that logins have been disabled. You will see a warning that the host is in maintenance mode.
You can now run the following commands to back up your files and database. As before, take note to adjust any file paths or usernames:
sudo tar -czf NextCloud-backup-$(date -I).tar.gz /var/www/html/nextcloud/The above command will create a compressed archive of your full Nextcloud install directory and place it in your current working directory. If you wish you can offload this file to another system using rsync or sftp but as long as it is not created inside /var/www/html/nextcloud the installer shouldn’t touch it so it should be safe.
We now run the next command to back up our database to a file in the current directory:
sudo mysqldump --single-transaction -u[username] -p[password] [databse name] > NextCloud-db-$(date -I).sqlbakIf you have set up your Nextcloud installation using my previous guide your username and database name will probably both be “nextcloud” but if your setup is different you will need to adjust accordingly. Additionally, if your database is not running on localhost you will need to specify the database location using the -h [hostname] flag. If the command is successful you should see a file in your current directory with a .sqlbak extension. This is a text file containing all the MySQL commands you would need to recreate the database in its current form. If a restore is needed, you will need to drop and recreate the existing database and then pipe the sql commands into the MySQL client as follows:
sudo mysql -u[username] -p[password] -e "DROP DATABASE nextcloud"
sudo mysql -u[username] -p[password] -e "CREATE DATABASE nextcloud"
sudo mysql -u[username] -p[password] [db_name] < [backupfilename].sqlbak
Installing the update
Now our files and database are safely backed up, we can proceed with the update process. The easiest way to do this is via the web interface, meaning we will need to disable maintenance mode:
sudo -u www-data php /var/www/html/nextcloud/occ maintenance:mode --offNow when we go to the web page we see that functionality has returned to normal and we will be able to log in. You will need to log in as the admin user to perform the update so if you normally work as a non admin user (you should be doing this) you will need to log out and back in as the admin.
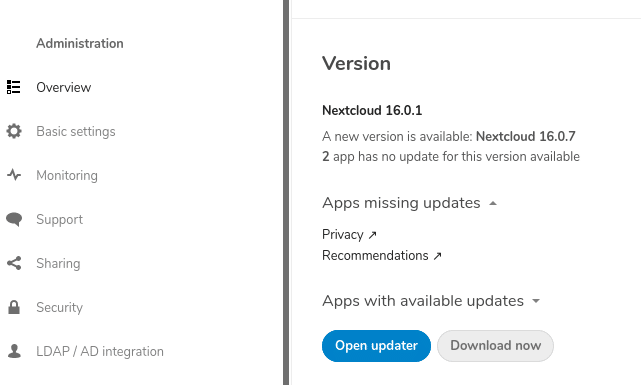
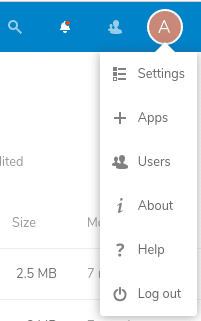
Click your user icon in the top right corner to go to the settings page. From here you will need to go to the “Overview” screen and click “Open updater”
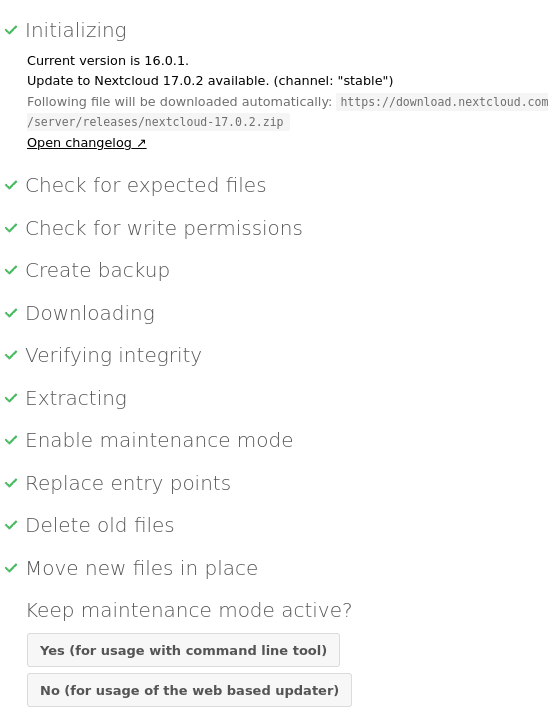
From the update screen you will be able to install the update. For the most part the installation is automatic and it will show you the steps it is taking and warn you if there are any problems which need manual intervention. You most likely won’t have any issues but if you do you should be able to find a solution on Google or leave me a comment and I will do my best to assist.
If all goes well you will see a screen similar to the one below. You will then be asked if you wish to keep maintenance mode active. As we want to use the web based updater to finish the update, select “no” for this.
You will then be taken to a screen with a list of the apps that need to be updated. As we are updating to a new major version there will be a lot of apps in this list. Just click “Start Update” to begin the installation. Note that at the bottom of the list you will see a list of incompatible apps which will be disabled if you go ahead with the update. If you rely on any of these apps you should not proceed with the update and should instead restore your Nextcloud deployment from the backups we created.
Once complete you will be given the option to view a detailed log of the installation process or just continue to your new Nextcloud installation. If everything has gone well with the update, you should be returned to the main login screen or your main home screen if you are already logged in. The look and feel of Nextcloud 17 is very similar to Nextcloud 16 as most of the changes focus on additional performance and security improvements. For the full list of changes, check out this article on the Nextcloud blog.