At the end of my previous article we had a functioning Zabbix server set up to monitor itself. To monitor other hosts, we will need to tell Zabbix about other devices on your network. The two main ways Zabbix can monitor a host are via an agent installed on the host or via SNMP. Generally you will monitor servers and workstations using Zabbix agent. Network devices such as switches, firewalls or even printers use SNMP. In this article I will describe the process of installing and configuring the Zabbix agent on 4 common operating systems. I will also cover the process of configuring the Zabbix server to talk to these agents.
Installing Zabbix Agent
Ubuntu 18.04
As with the server installation, we need to install a package repo for the version of Zabbix we wish to install. As this is a fresh installation we will install the repo for Zabbix 4.0 to be as up to date as possible but older agent versions (as far back as 1.4) will work with the 4.0 version of the server. The agent cannot be newer than the server. For instance, you can’t install Zabbix agent 4.4 if you are using Zabbix Server 4.0.
To install the repo, we will need to know the repo name for the version of Ubuntu we are using. In this example I am using 18.04 (Bionic Beaver) so the repo name will be “bionic”, if you are installing on a different version, you will need to adjust that accordingly in the following commands:
wget https://repo.zabbix.com/zabbix/4.0/ubuntu/pool/main/z/zabbix-release/zabbix-release_4.0-2+bionic_all.deb
dpkg -i zabbix-release_4.0-2+bionic_all.deb
apt update
Once the repo is installed, we can install the zabbix-agent package via apt:
apt install zabbix-agentWe now need to edit the configuration file to tell the agent where to find the server. Open /etc/zabbix/zabbix_agentd.conf in your preferred text editor and make the following changes to tell the agent which Zabbix servers are allowed to talk to it:
Server=[IP or hostname of your Zabbix server]
ServerActive=[IP or hostname of your Zabbix server]
We also need to tell Zabbix the hostname of the system. This doesn’t have to be the actual hostname, it is the display name we will use within Zabbix for the system. Comment out the default value of Hostname=Zabbix server and replace it with the following:
HostnameItem=system.hostnameThis will tell the agent to automatically populate the hostname value with the system hostname. You could just set the hostname within the configuration file. However, automatically populating it allows you to reuse the same configuration file across all your hosts, simplifying automation if you have a lot of hosts to monitor.
If you have a firewall configured on your server, allow connections from the Zabbix server on port 10050/tcp:
ufw allow from [Zabbix server IP] to any port 10050 proto tcpStart the Zabbix agent:
systemctl enable zabbix-agent
systemctl restart zabbix-agent
CentOS 8
As with the Ubuntu installation, enable the Zabbix repo and install the agent:
rpm -Uvh https://repo.zabbix.com/zabbix/4.0/rhel/8/x86_64/zabbix-release-4.0-2.el8.noarch.rpm
dnf install zabbix-agent
Once the application is installed, edit /etc/zabbix/zabbix_agentd.conf to change the following lines:
Server=[IP or hostname of your Zabbix server]
ServerActive=[IP or hostname of your Zabbix server]
#Hostname=Zabbix server
HostnameItem=system.hostname
If you have already created a config file based on the Ubuntu guide you can copy that file over the default one rather than having to make the changes again.
Allow Zabbix through the firewall:
firewall-cmd --add-rich-rule='rule family="ipv4" source address="172.16.24.8" port protocol="tcp" port="10050" accept' --permanent
firewall-cmd --reload
Restart and enable the Zabbix service:
systemctl enable zabbix-agent
systemctl restart zabbix-agent
Windows
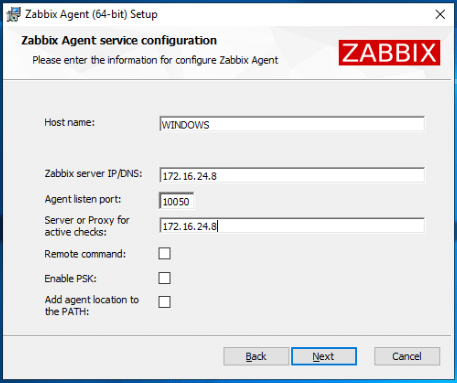
Download and install the agent MSI file from https://www.zabbix.com/downloads/4.0.17/zabbix_agent-4.0.17-windows-amd64-openssl.msi. During the installer you will be prompted to configure the connection to the server. Enter the details for the hostname and server IP address as follows:
If you want to generate a config file that can be used between systems so you can automate installation, finish the installation and find the config file at C:\Program Files\Zabbix Agent\zabbix_agentd.conf and replace the Hostname field for a HostnameItem field as we did with the Linux servers. Then you could deploy the installer and configuration file automatically via group policy. While much of the configuration is the same between Linux and Windows, there are certain differences such as file paths so you can’t copy the configuration files between Linux and Windows.
pfSense
From the pfSense dashboard, go to System > Package Manager > Available Packages and search for “zabbix-agent4”. Install the zabbix-agent4 package.
Go to Services > Zabbix Agent 4.0, enable the service and configure the values for Server, ServerActive and Hostname.
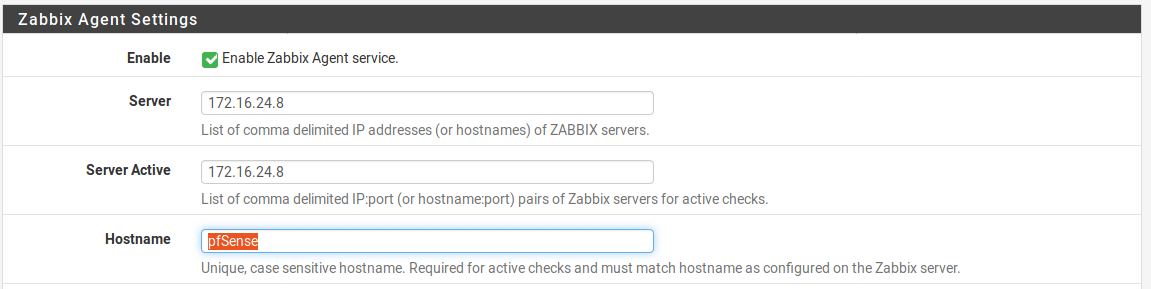
The rest of the settings can usually be left as default so scroll to the bottom and click “Save”.
Connect Zabbix agent to Zabbix server
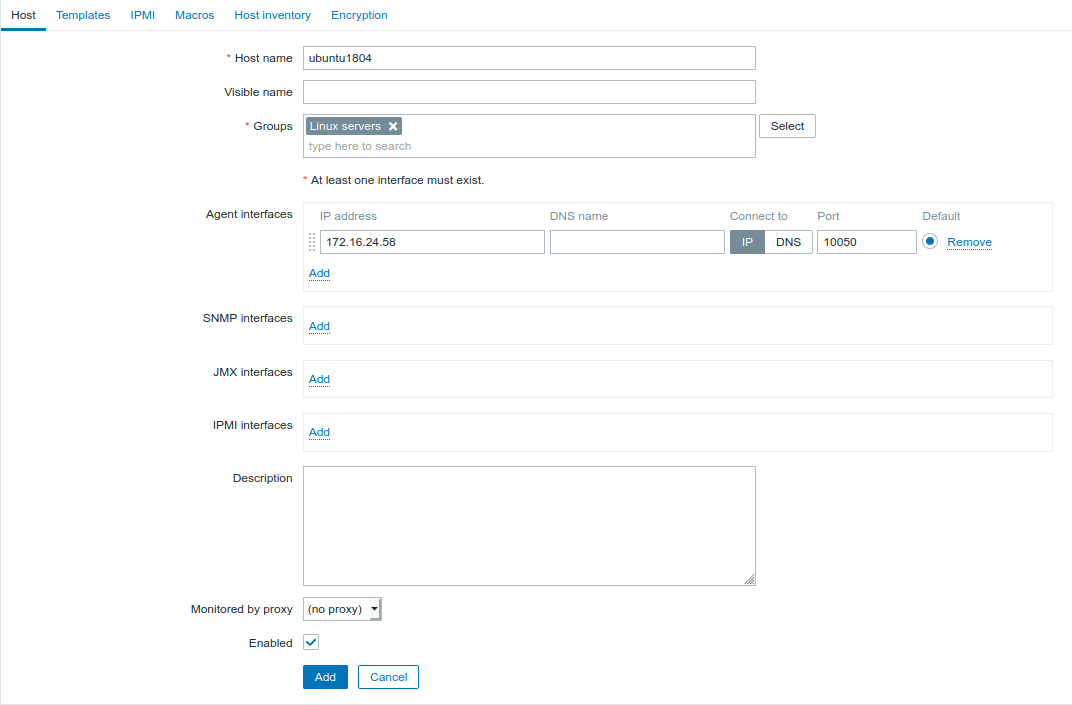
Now the agent is installed, it must be added to Zabbix. Log in to the Zabbix frontend and go to Configuration > Hosts > Create Host.
Enter the hostname for the device you are adding. This must match the hostname you configured in the agent. If you used the suggested configuration above, this will match the system hostname in most cases but if you set a different hostname set it here as well. Additionally tell Zabbix where to find the agent, this can be either an IP address or a hostname. All hosts must be members of at least one group. Zabbix comes with some pre-configured groups but if you want to create extras you can just type the group name you want into the Groups search field and it will give you the option to add it.
Now go to the Templates tab to assign monitoring templates to the host. These templates are lists of checks for the Zabbix server to run and alerts for it to generate. Hosts can have any number of templates applied (although not if 2 templates perform the same check) and you can also assign items to individual hosts without using templates but this should be avoided due to the additional administrative overhead. For our Ubuntu and CentOS servers we will apply the template “Template OS Linux” to provide standard checks for system resources such as CPU and RAM usage, disk space, process counts etc. The equivalent templates for Windows and pfSense are “Template OS Windows” and “Template OS FreeBSD”
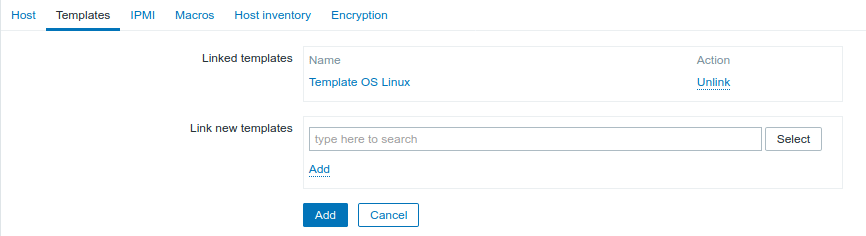
When you select a template from the search bar, you need to click the small Add button to add it to the Linked templates list. The Add button at the bottom of the page will add whatever is in the Linked templates field, not anything in the search bar.
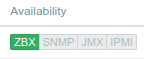
Once you have added the templates you want, click the Add button to create the host. It can take a few minutes for the agent and the server to begin talking to each other but when they do, you should see Zabbix Agent availability marked in green against the host you have added.
Add your other hosts and check that they all show up as available in the host list.
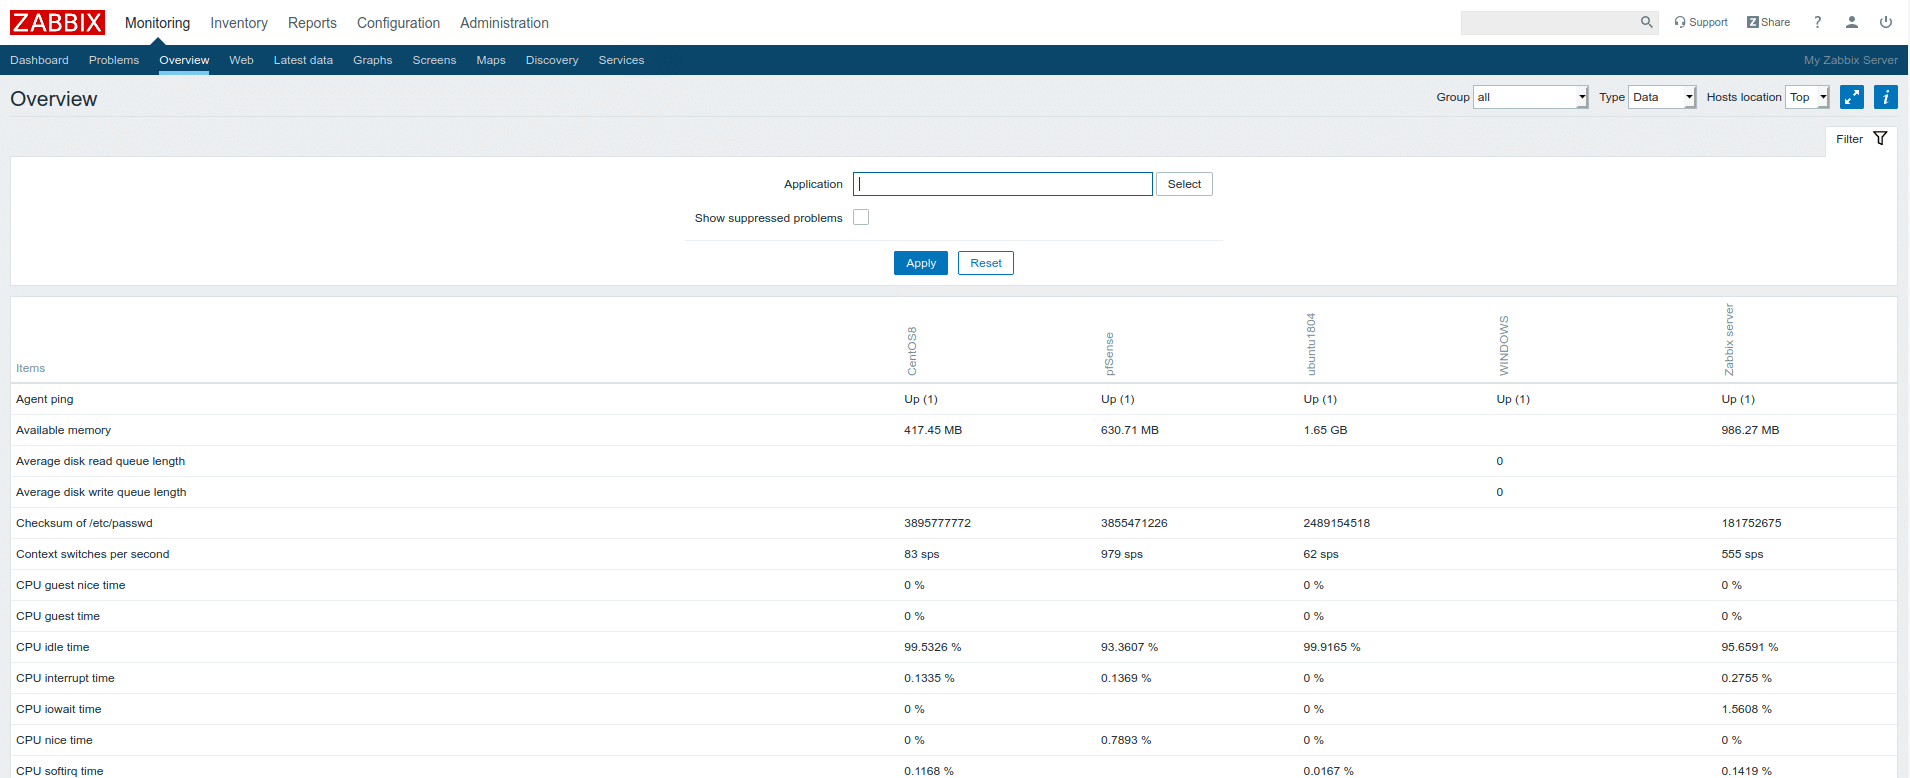
You can now check what data you are collecting by going to Monitoring > Overview and selecting “Data” from the “Type” drop down box. You should see a large number of monitored items and the latest value for each of them. Note that not all items are applicable to all hosts. If you have hosts running with different configurations you will probably see gaps in this screen.
As we are just using the default templates you will probably find that you get a lot of alerts which you might not care about or triggers that are set at the wrong level. Take care to review the alerts you get and decide whether they are relevant to your monitoring needs. Seeing the same alert too often can lead to ignoring it, meaning you might miss an actual issue because you’re so used to seeing the alert.